Using Reverse Proxy + External Access
Sun-Proxy is a simple implementation of basic reverse proxy functionality developed by the author using Go. Its purpose is to support the Sun-Panel plugin (future plans include integrating them to allow configuration within Sun-Panel, achieving true modularity). In addition to Sun-Proxy, we will also use frp for internal network penetration.
This tutorial utilizes docker-compose to greatly simplify the process. If you find any shortcomings or have better methods, please feel free to contact the author.
Use with Caution
Due to the recent development of the Sun-Proxy program, its stability is yet to be tested. Please use it with caution.
Objectives
This tutorial is specifically for users who do not have a public IP at home, allowing external access to the website hosted on NAS through a domain (subdomain or path) with SSL authentication. It also supports automatic input of basic auth authentication and adds an additional layer of basic auth authentication for public websites.
Prerequisites
- A server with a public IP (cloud server)
- Domain name
- frp server set up on the server installation guide
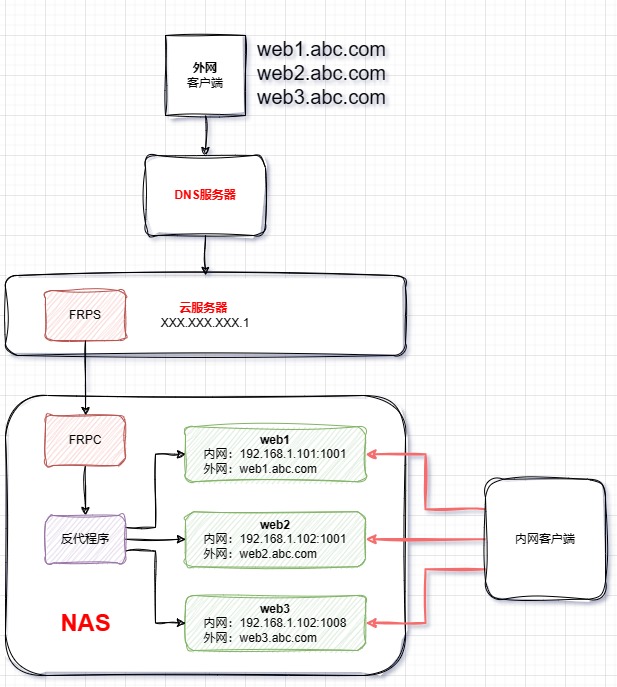
Illustration:
Domain Resolution and Security Groups
Resolve your (sub)domain to the IP you want to use. If using a cloud server, open two ports in the security group in advance: one for http and another for https. If SSL is required, apply for the certificate in advance.
Docker Compose Execution
Create a folder named
sun-panel-proxy. Inside it, create three files:sun-proxy.yml,frpc.toml, anddocker-compose.yml.
- Edit the configuration file in advance
docker-compose.yml
version: "3.2"

services:
    sun-panel:
        image: 'hslr/sun-panel:latest'
        container_name: sun-panel
        volumes:
            - ./conf:/app/conf
            - ./uploads:/app/uploads
            - ./database:/app/database
            # - ./runtime:/app/runtime
        ports:
            - 3002:3002
        restart: always
    sun-proxy:
        image: 'hslr/sun-proxy:latest'
        container_name: sun-proxy
        volumes:
            - ./sun-proxy.yml:/app/sun-proxy.yml
            - ./cert:/app/cert # cert path
        restart: always
        command: ['./sun-proxy', '-c', './sun-proxy.yml']
    frpc:
        image: 'snowdreamtech/frpc:latest'
        container_name: frpc
        volumes:
            - ./frpc.toml:/etc/frp/frpc.toml
restart: alwayssun-proxy.yml(The following file is an example; modify it according to your needs. Refer to the Sun-Proxy documentation for complete details.)
name: sun-proxy
port:
  http: 8080
  https: 8081
rules:
  - domain: "sun.panel.com" # sun-panel
    path: "/"
    target_url: "http://192.168.3.100:3002"

  - domain: "example.com" # Proxy domain (should not include port)
    path: "/" # Proxy address /example/other/path
    target_url: "http://google.com/" # Target address http://example.sun.sun
    cert: # Certificate address
      key:
        ./cert/privkey.key
      pem:
        ./cert/fullchain.pem
    auth: # Authentication information
      username:
        admin
      password:
        123456
    target_basic_auth: # Target authentication information (automatically input)
      username:
        admin
      password:
123456- Edit the configuration file in advance
frpc.toml(The following file is an example; modify only if necessary.)
serverAddr = "x.x.x.x" # Public IP of the server
serverPort = 8004

# Set a password consistent with the server, remove "#" at the beginning of the line if you want to set it
# auth.token = "12345678"

[[proxies]]
name = "http"
type = "tcp"
localIP = "sun-proxy" # Need to correspond to the name of the sun-proxy container
localPort = 8080    # Should correspond to port.http in sun-proxy.yml on the NAS side
remotePort = 8080   # Open port on the server

[[proxies]]
name = "https"
type = "tcp"
localIP = "sun-proxy" # Need to correspond to the name of the sun-proxy container
localPort = 8081    # Should correspond to port.https in sun-proxy.yml on the NAS side
remotePort = 8081 # Open port on the server- Start and Stop
Navigate to the directory and open the command line:
# Run (-d for running in the background)
docker-compose up -d

# Stop
docker-compose down