使用反向代理+外网访问
Sun-Proxy是作者使用go开发的,简单实现了基本的反向代理功能。目的是为 Sun-Panel插件打造(后期会想办法结合到一起,可以在sun-panel中配置,真正的做到插件化)。除了它我们还要使用到frp来实现内网穿透。
本教程通过docker-compose来实现,大大的减少了使用难度。如有哪里不足或者你有更好的方法,还请不吝赐教联系作者。
谨慎使用
由于Sun-Proxy程序刚开发出来,程序稳定性有待测试,请谨慎使用
实现目标
本教程只针对家里没有公网ip的用户,在外通过域名(二级域名或者路径)访问NAS搭建的网站,ssl认证。并且支持自动输入basic auth认证和对公开网站加一层basic auth认证,
前提
- 有一台有公网ip的(云)服务器
- 域名
- 已经在服务器内搭建了frp服务端安装教程
图解
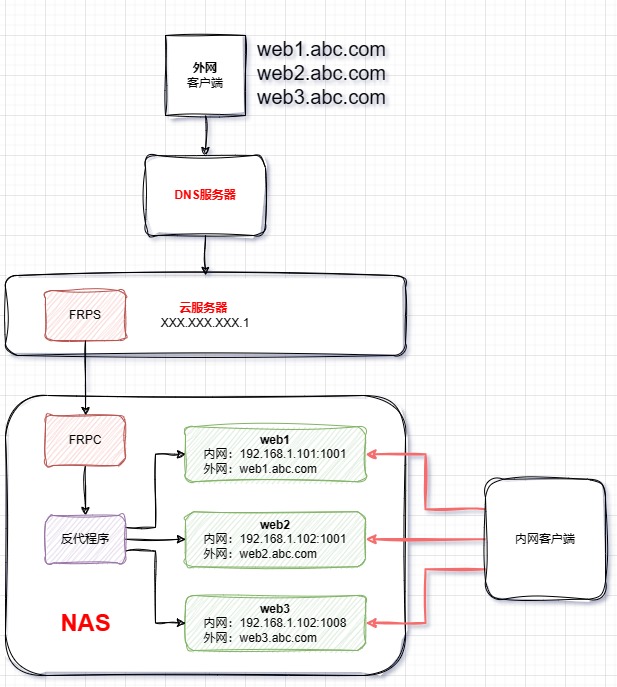
域名解析和安全组
将你的(二级)域名解析到你要使用的ip上,如果是云服务器需要提前到安全组提前开放2个端口,一个是http另一个是https,如果需要ssl,需要自行提前申请证书
docker compose 运行
创建一个文件夹
sun-panel-proxy,里面创建3个文件,分别为docker-compose.yml,sun-proxy.yml,frpc.toml,
- 提前编辑好配置文件
docker-compose.yml
yml
version: "3.2"

services:
    sun-panel:
        image: 'hslr/sun-panel:latest'
        container_name: sun-panel
        volumes:
            - ./conf:/app/conf
            - ./uploads:/app/uploads
            - ./database:/app/database
            # - ./runtime:/app/runtime
        ports:
            - 3002:3002
        restart: always
    sun-proxy:
        image: 'hslr/sun-proxy:latest'
        container_name: sun-proxy
        volumes:
            - ./sun-proxy.yml:/app/sun-proxy.yml
            - ./cert:/app/cert # 证书目录
        restart: always
        command: ['./sun-proxy', '-c', './sun-proxy.yml']
    frpc:
        image: 'snowdreamtech/frpc:latest'
        container_name: frpc
        volumes:
            - ./frpc.toml:/etc/frp/frpc.toml
restart: alwayssun-proxy.yml(下面文件是示例,根据自己需求修改)完整可以参考Sun-Proxy文档
yml
name: sun-proxy
port:
  http: 8080
  https: 8081
rules:
  - domain: "sun.panel.com" # sun-panel
    path: "/"
    target_url: "http://192.168.3.100:3002"

  - domain: "example.com" # 代理域名(不可以带端口)
    path: "/" # 代理地址 /example/other/path
    target_url: "http://google.com/" # 目标地址 http://example.sun.sun
    cert: # 证书地址
      key:
        ./cert/privkey.key
      pem:
        ./cert/fullchain.pem
    auth: # 验证信息
      username:
        admin
      password:
        123456
    target_basic_auth: # 目标验证信息(自动输入)
      username:
        admin
      password:
123456- 提前编辑好配置文件
frpc.toml(下面文件是示例,如果无特殊需求的只需要更改加深部分参数)
toml
serverAddr = "x.x.x.x" # 服务器的公网ip
serverPort = 8004

# 自己设置密码与服务端保持一致,如需设置需要删除下面行开头的"#"
# auth.token = "12345678"

[[proxies]]
name = "http"
type = "tcp"
localIP = "sun-proxy" # 需对应 sun-proxy 容器的名称
localPort = 8080    # NAS端需要与 sun-proxy.yml 中的 port.http 对应
remotePort = 8080   # 服务器开放端口

[[proxies]]
name = "https"
type = "tcp"
localIP = "sun-proxy" # 需对应 sun-proxy 容器的名称
localPort = 8081    # NAS端需要与 sun-proxy.yml 中的 port.https 对应
remotePort = 8081 # 服务器开放端口- 启动与停止
进入目录打开命令行
sh
# 运行(-d 后台运行)
docker-compose up -d

# 关闭
docker-compose down